Showing posts with label Iced COOKIES. Show all posts

5.21.2012

tulip cookie tutorial by haniela

Hello! ~ Hola!
Today is a special day here at CancunCOOKIES... a very special friend is visiting us! ~ Hoy es un día especial aquí en CancunCOOKIES... una amiga muy especial está de visita!

Let me introduce her by mentioning a few things you might not know about her ~ Permite que la presente, platicando de algunas cosas que quizá no sabes acerca de ella:

She decorated her first Christmas COOKIES on 2007, inspired by a magazine. She had decorated  Honey COOKIES before ~ Decoró sus primeras GALLETAS de Navidad en 2007, inspirada por una revista. Antes, había decorado GALLETAS de Miel...
Those first COOKIES were decorated with canned Buttercream ~ Decoró esas primeras GALLETAS con Buttercream (Betún) envasado...
Her work is influenced by Honey COOKIES from her home country, Slovakia ~ Su trabajo está influenciado por GALLETAS de Miel de su país de origen, Eslovaquia...
In Slovakia, they use parchment cones or little bags to decorate, and that is what Hani uses: ziploc bags! ~ En Eslovaquia, usan conos de papel o bolsitas para decorar, y eso es lo que Hani usa: bolsas ziploc!

*Si no hablas Inglés, puedes usar Google Translate para traducir el post de Haniela al Español


Hello, I'm Hani from Haniela's. You can find out more about me by visiting my  blog where I share online baking tutorials, recipes,  I also like to make pretty cookies and I love food and developing new unique recipes, some include also our family heirlooms, usually with a twist. If you can't find me in the kitchen then I'd probably ventured out into our beautiful garden we care for in the Summer time or I'm behind the lens, pressing the shutter capturing  the world of food, or on  the weekends I thoroughly enjoy visiting flea markets, local yards sales, finding the lost treasures. 


Bea and I first met online on Flickr, few years ago and today I'm so honored to be a guest on Bea's beautiful blog.
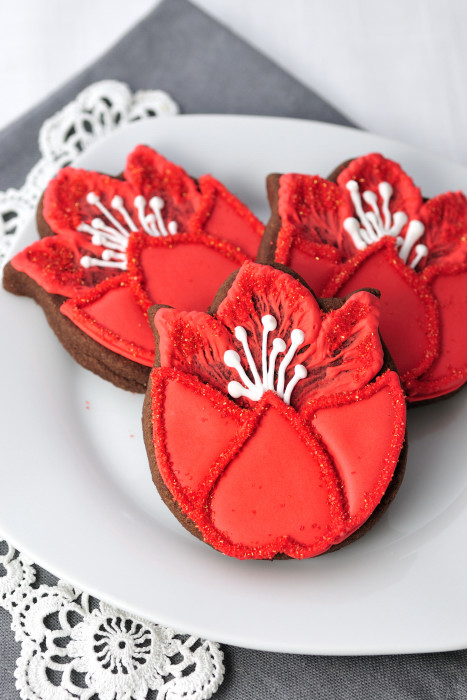
I prepared a Tulip Cookie Tutorial  for you. I wanted to achieve a new dimension with a tulip cookies ,tulip cookies are mostly decorated flat so I thought I'd play around a little.
In this tutorial you will find embroidery technique and sanding sugar application, both techniques play a key role in this  tulip design.
  •  Bake cookies, and prepare Royal icing, color icing with food color and make outline consistency icing(thin the icing down with a bit of water to about a toothpaste consistency) and flood consistency.
  • You need 2 colors, for the petals and then for the flower stamens
  •  Pipe a thick border with outline consistency royal icing, do one section at a time
  • Using a  clean painter's brush, brush by pull the icing inward toward the center of the cookie, wipe the brush into a damp towel if necessary
  • Continue with other sections, all together there are 3 sections you need to do this


  • Once you have the brushed embroidery details finished you can move onto the front petals
  • Pipe the petals
  • Flood the petals with flood consistency icing
  • Let dry for several hours


  • Once the icing has dried you can move onto adding details
  • First you need to pipe flower stamens and let them dry for an hour or so, use outline consistency icing to do this
  • Then outline the petals with outline consistency icing 
  • Sprinkle sanding sugar on top of the freshly piped icing, shake off the excess


  • Pipe small dots onto the dry brushed embroidery design, you want only random dots, pipe only several dots not a whole lot
  • Using a clean painter's brush, brush the icing inward
  • Immediately sprinkle sanding sugar on top freshly brushed icing
  • Shake of the excess


Pretty Tulip Cookies


Thank you Hani for visiting us today! I love your COOKIES and it is always a pleasure to look a your beautiful pictures... ~ Gracias Hani por visitarnos hoy! Me encantan tus GALLETAS y es siempre un placer ver tus hermosas fotografías...


Be sure to taste Hani's Honey COOKIES. I tasted them last Fall and I can tell you they are awesome! ~ Asegúrate de probar las GALLETAS de Miel de Hani. Yo las probé el Otoño pasado y puedo decirte que son fabulosas!

post signature

5.14.2012

seashells, starfish, sand dollars + packing cookies

Mini SeaShells, StarFish and Sand Dollars
Hello!! I've been working on some minis... I love minis! They are great for jars and boxes ~ Hola!! He estado trabajando en unos minis... me encantan las minis! Son excelentes para frascos y cajas...

Today I will show you how I pack some boxes ~ Hoy les voy a mostrar como empaco algunas cajas...

Bag, Pack and Wrap your COOKIES ~ Embolsa, empaca y envuelve tus GALLETAS


I use clear celophane bags... you want to buy food safe. And we need some kind of device for sealing bags. You can get a heat sealing machine or as I did, use a mini flat iron. I use mine exclusively for this purpose ~ Yo uso bolsas de celofan... compra las que son especiales para alimentos. Y necesitamos un aparato que sirva para sellar bolsas. Puedes comprar una selladora de calor o como hice yo, usar una mini planca alaciadora. Esta la usa exclusivamente para este propósito...


Cute, isn't it? ~ Linda, verdad?


Start by bagging your minis ~ Empieza por embolsar tus minis...


I turn the iron On once I have all the COOKIES bagged, that way I work faster ~ Yo enciendo la plancha una vez que tengo todas las GALLETAS embolsadas, de esa forma trabajo más rápido...


Be careful when using the flat iron! It gets VERY HOT and you can burn and end with an ugly blister. Also, turn it Off if it gets too hot, or it will crinkle the celophane. We are looking for nice flat sealing ~ Ten cuidado cuando uses la plancha alaciadora! Se pone MUY CALIENTE y puedes quemarte y terminar con una ampolla. Tambien, apágala si se pone muy caliente, o va a arrugar el celofán. Estamos buscando un lindo sellado liso...


Leave 1/2" between the COOKIE and the place where you seal the bag ~ Deja 1 cm entre la GALLETA y el lugar en donde vas a sellar la bolsa...


Place the bagged COOKIES in the box ~ Pon las GALLETAS embolsadas en la caja...


This box has 2 layers of 4 bags with 3 mini COOKIES on each bag... that's 2 dozen COOKIE box ~ Esta caja tiene 2 capas de 4 bolsas con 3 mini GALLETAS en cada bolsa... es una caja con 2 docenas de GALLETAS...


I used Tangerine Twine from The Twinery and added these Sand Dollar & Starfish Double Punch by Martha Stewart ~ Use Tangerine Twine de The Twinery y le agregué Sand Dollar & Starfish Double Punch by Martha Stewart...


Same box with Grosgrain Ribbon ~ La misma caja con Listón de Popotillo...


Corporate gift with one regular COOKIE and 2 layers of 5 minis. Love the blue! ~ Regalo corporativo con una GALLETA tamaño regular y dos capas de 5 minis. Me encanta ese azul!


A mini gift... I used Coffee Sack Brown Jute Twine I received as gift from my friend RosaMaria ~ Un mini detallito... Usé Cordón de Jute en color Coffee Sack Brown que me regaló mi amiga RosaMaria...


Mini SeaShell Minis


Hope you liked these ideas... I will share more wrapping ideas with you in the future ~ Espero que les hayan gustado estas ideas... Voy a compartir otras ideas para envolver en el futuro...

post signature

5.10.2012

minis... seashell, starfish and sand dollars

SeaShells, Starfish and Sand Dollar Mini COOKIES ~ Mini GALLETAS de Caracolas, Estrellas de Mar y Moneditas
Working on these... come back Monday to see how I packed and wrapped them ~ Trabajando en estas GALLETITAS... regresa el Lunes para ver cómo las empaqué y envolví...
post signature

4.30.2012

april showers plaque


April Showers Plaque ~ Placa Lluvias de Abril
I am completely in love with Fancy Square COOKIE Cutter from Coppergifts, I NEED the other two sizes that were not available when I purchased this one :D ~ Estoy perdidamente enamorada del  Cortador de GALLETAS Fancy Square de Coppergifts, NECESITO los otros dos tamaños que no estaban disponibles cuando compre este :D


Today I will show you how I made the Plaque April Showers COOKIE, and you will see how I make some fun details, too! ~ Hoy te voy a mostrar cómo hice la GALLETA Placa Lluvias de Abril, y te voy a mostrar cómo decore algunos detalles, tambien!


1. Outline with pale Royal Blue Icing ~ Delínea con Icing Royal Blue, pálido.


2. Flood with 20 Second Consistency Icing, leaving some spaces ~ Rellena con Icing Consistencia 20 Segundos, dejando unos espacios.


3. Flood the spaces with 20 Second Consistency Icing in White ~ Rellena los espacios con Icing consistencia 20 Segundos en Blanco


4. Let dry 8 hours or overnight ~ Deja secar 8 horas o toda la noche.


5. Outline the Umbrella (I used Leaf Green). Flood alternated sections to give dimension ~ Delínea el Paraguas (yo usé Leaf Green). Rellena secciones de forma intercalada para dar dimensión.


6. Flood remaining section. Let dry 2 hours ~ Rellena la sección restante. Deja secar 2 horas.


7. Pipe dots with Golden Yellow Icing ~ Dibuja puntitos con Icing Golden Yellow.


8. Pipe dots with Deep Pink, leave a space between dots ~ Dibuja puntitos con Deep Pink, deja un espacio entre los puntitos.


9. Fill the spaces with more dots. Repeat with Orange dots ~ Llena los espacios con más puntitos. Repite con puntitos Orange


April Showers Plaque ~ Placa Lluvias de Abril


Finish with details: Umbrella Tube and Cap, pipe "April Showers"... tada!!! ~ Termina con detalles: Bastón y Botón del Paraguas, escribe "April Showers"... listo!

More COOKIES ~ Más GALLETAS:

Come back later to see the fabulous April Shower COOKIES our Flickr group {Show Me} Your Cookie! made this month ~ Regresa para ver las fabulosas GALLETAS de Lluvias de Abril que nuestro grupo de Flickr {Muéstrame} Tu Galleta! hizo este mes...


post signature

4.26.2012

baby shower cookies: ducklings and bluebirds

Ducklings and BlueBirds COOKIES ~ GALLETAS de Patitos y Pajaritos Azules
Hello again! ~ Hola de nuevo!


Remember yesterday I mentioned Elmo was coming to play with us? Here he is!! And with his help we'll work on two COOKIES perfect for Babies ~ Te acuerdas que ayer mencioné que hoy Elmo iba a jugar con nosotros? Aquí está!!

For these COOKIES I used the Sesame Street Cookie Cutter Set ~ Para estas GALLETAS usé el juego de cortadores de Plaza Sesamo.


1. Outline the Umbrella in White ~ Delínea el Paraguas con Blanco.


2. Outline the Duckling Head, Body and Left Wing with Golden Yellow ~ Delínea la Cabeza, Cuerpo y Ala Izquierda del Patito con Golden Yellow. 


3. Start flooding by sections, and waiting before flooding the next one to give dimension ~ Empieza a rellenar por secciones, y esperando a rellenar la siguiente para dar dimensión.


 4. Let dry for 8 hours or overnight ~ Deja secar 8 horas o toda la noche.


5. Draw vertical and horizontal lines using Food Color Pens ~ Dibuja líneas verticales y horizontales usando Plumones de Colores.


6. Outline and flood the Right Wing. I didn't wait for the Food Color Pens to dry, so the blue shows under the yellow icing :( ~ Delínea y rellena el Ala Derecha. Yo no espere a que los Plumones de Colores se secaran, por eso se nota el azul debajo del icing :(


7. Finish your COOKIE by adding details: Feathers on top of the head, Umbrella Tube and Cap, Beak, and Eyes ~ Termina tu GALLETA con detalles: Plumitas arriba de la Cabeza, Bastón y Botón del Paraguas,  Piquito y Ojos.


I made the Blubird using 20 Second Consistency RI, but it is basically the same ~ Hice el Pajarito Azul usando RI Consistencia 20 Segundos, pero es basicamente lo mismo


More COOKIES ~ Más GALLETAS:
Wellies and Umbrella for a cloudy day
April Showers Babies
BlueBirds and Nest
Little BlueBird and Nest with Eggs

This month, on our COOKIE Project on our Flickr group {Show Me} Your Cookie! we are working on April Showers... Join us! ~ Este mes, en nuestro Proyecto de GALLETA de nuestro grupo de Flickr {Muéstrame} Tu Galleta! estamos trabajando en Lluvias de Abril... Unete!

post signature
Related Posts Plugin for WordPress, Blogger...